Archives

REAL Food Recipe: Green Bean Casserole

gb casserole final

In my family, Green Bean Casserole is a must at any holiday meal.  In the past, I have made the “traditional” green bean casserole with the canned soup and processed onions, but in my opinion, this very simple recipe with all real food ingredients is much better!  The onions and peppers caramelize, and it is SO good!  I make it for every holiday and the adults love it!  (My kids don’t like anything that is made with onions, but hopefully that will eventually change.)

Ingredients:

gb casserole ingredients

  • 1 pound fresh green beans, cut (about 3 cups)
  • 1 large (or 2 small) onions, chopped (about 2 cups)
  • 1 medium green pepper, chopped (about 2 cups)
  • Paprika
  • Salt
  • Pepper
  • 3 Tablespoons butter, cut into cubes

Instructions:

  1. Preheat oven to 350°.
  2. Butter the bottom of an 8 x 8 baking dish.
  3. Wash green beans, remove ends, and cut into bite sized pieces (about 1 inch)
  4. Place 1 cup green beans into the baking dish.
  5. Top with 1 cup onions and 1 cup green peppers.
  6. Sprinkle paprika, salt, and pepper.
  7. Cut 1 Tablespoon butter into 4 cubes.  Place one cube in each corner on top of the vegetables.gb casserole
  8. Add one cup of green beans, then the remaining onions and the remaining green pepper.
  9. Sprinkle paprika, salt, and pepper.
  10. Cut 1 Tablespoon remaining butter into 4 cubes.  Place cubes over this layer, spaced evenly.gb casserole2
  11. Add the remaining green beans.
  12. Cut remaining Tablespoon butter into 4 cubes.  Place on top of this layer, spaced evenly.gb casserole3
  13. Cover tightly with aluminum foil.
  14. Bake until green beans are tender (about 1 – 1 1/2 hours).gb casserole time

This is what it will look like when it is finished cooking.  Enjoy!! 🙂

gb casserole cooked

Green Bean Casserole

Prep time: 

Cook time: 

Total time: 

Ingredients
  • 1 pound fresh green beans, cut (about 3 cups)
  • 1 large (or 2 small) onions, chopped (about 2 cups)
  • 1 medium green pepper, chopped (about 2 cups)
  • Paprika
  • Salt
  • Pepper
  • 3 Tablespoons butter, cut into cubes
Instructions
  1. Preheat oven to 350°.
  2. Butter the bottom of an 8 x 8 baking dish.
  3. Wash green beans, remove ends, and cut into bite sized pieces (about 1 inch)
  4. Place 1 cup green beans into the baking dish.
  5. Top with 1 cup onions and 1 cup green peppers.
  6. Sprinkle paprika, salt, and pepper.
  7. Cut 1 Tablespoon butter into 4 cubes. Place one cube in each corner on top of the vegetables.
  8. Add one cup of green beans, then the remaining onions and the remaining green pepper.
  9. Sprinkle paprika, salt, and pepper.
  10. Cut 1 Tablespoon remaining butter into 4 cubes. Place cubes over this layer, spaced evenly.
  11. Add the remaining green beans.
  12. Cover tightly with aluminum foil.
  13. Bake until green beans are tender (about 1 - 1½ hours)


October Unprocessed: The Inspiration Behind Journey to Complete Wellness

october-unprocessed-2014 logo

One year ago, I took the October Unprocessed Challenge and spent the entire month of October 2013 eating only REAL, unprocessed foods.  It was a huge learning experience for me!  During the challenge, I felt terrific and full of energy all day long.  I discovered some wonderful new foods and recipes, and I connected with a whole world of like-minded people committed to improving their health and supporting each other.  It became a lifestyle change for me and my family.  I found healthy replacements for a lot of the foods we ate.  Overall, I felt great about all the positive changes I made to improve the health and wellness of my family.  Although it certainly was not easy at times, the rewards definitely outweighed the challenges.  To learn about ALL the benefits and challenges I encountered during this experience, check out my blog post here.

Upon completing the challenge on October 31, I was inspired to start this blog, Journey to Complete Wellness.  What a blessing that has been!  I invite you to join me and over 16,000 others in this year’s October Unprocessed Challenge by taking the October Unprocessed 2014 pledge here.  Who knows what it will inspire YOU to do?

If an entire month seems too overwhelming, you can take the pledge for a week, or even a day.  It is not as difficult as it may seem.  You are allowed some “deliberate exceptions” (foods you can’t live without), and you take the challenge on your own terms.  The main goal is to become aware of the foods you are putting into your body.  It was truly an eye-opening experience for me!

Any step toward wellness is a step in the right direction.  You can do it!

I plan to track this year’s progress in this blog, so stay tuned for some new and exciting REAL-food recipes!

Please leave a comment below if you decide to sign up!  Good luck! 🙂

Recipe: Blueberry Banana Smoothie

August 5, 2014 007 crop2

If you have been looking for ways to use up all those delicious blueberries that are in season right now, give this healthy smoothie recipe a try.  This drink is very filling and it would serve as a delicious breakfast, lunch, or a snack!  Enjoy it any time of the day!  We have been making this smoothie a lot lately, and I’m happy to say that ALL of my daughters love this one! 🙂

Ingredients:

1/2 cup milk

1/2 cup yogurt (I like Stonyfield Banilla)

1/2 cup fresh blueberries

1/2 cup frozen strawberries

1 frozen banana

1/2 cup organic spinach or other greens (optional – I usually don’t add this because my daughters will not drink it if they know there are greens in it.)

Instructions:

  1. In a blender, combine all ingredients.  Blend until smooth.

Notes: 

Make sure at least one of your ingredients is frozen to make your smoothie cold.  If you do not have any frozen ingredients, you may want to add some ice.

This smoothie is best served immediately, especially if you are using the greens.

If you are adding greens, blend the greens and the liquid until smooth before adding the remaining ingredients.

Enjoy! 🙂

Strawberries: 10 Ways to Eat Them

10 Ways to Eat Strawberries

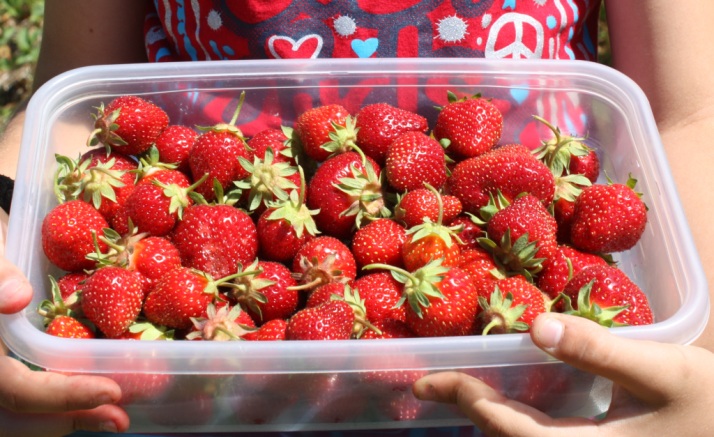
Nothing says summer like fresh strawberries!  In my previous post 9 Reasons To Pick Your Own Strawberries, I mentioned that I had been on 6 fun-filled strawberry-picking excursions with my daughters last month (and I’ve even been again since that post!)  One would think we would have more strawberries than we know what to do with, but the truth is I’ve been having trouble keeping the strawberries long enough to make anything out of them.  My girls devour them (sometimes even before we get home!)  It wasn’t easy, but I did manage to save some strawberries to make a few things. Here are 10 delicious ways to use those fresh-picked, juice-dripping strawberries!

1.  Eat them just as they are!

Of course, this is the healthiest (and our favorite) way to eat them, and they don’t last long.

June 22, 2014 045 crop

2.  Chocolate-Dipped Strawberries!

June 26, 2014 074 crop

Who doesn’t love the combination of chocolate and strawberries, right?  And truly, they couldn’t be easier to make! It requires 2 ingredients – Fresh picked strawberries & Baker’s Dipping Chocolate (you can find this in the baking aisle of your local grocery store – next to the chocolate chips.)

June 26, 2014 079 crop

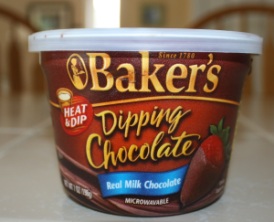
Simply melt the chocolate as instructed, dip your strawberries, place on a tray on waxed paper, and enjoy!  If you prefer the chocolate a little bit harder (as we do), place in the refrigerator for about 10-15 minutes.

3.  Strawberry Jam

June 29, 2014 014

June 29, 2014 021

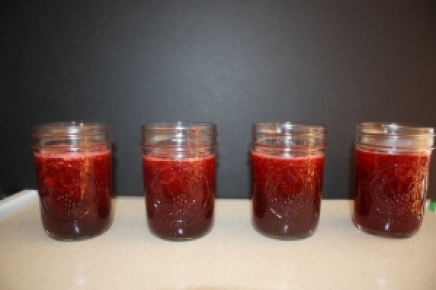
This was our first attempt at making strawberry jam.  Although this particular recipe didn’t go over well with my family, I’m including it in here anyway since we spent the time making it.  Based on the reviews, it is very popular and it does seem like most people enjoyed it.  We halved the recipe since I didn’t know if we would like it and I wasn’t sure how much it would make.  It ended up filling 4 mason jars (8oz each).  Since I normally try to minimize the amount of sugar I put into recipes (and this time I didn’t), for us it seemed way too sweet.  I think next time I would use much less sugar.  You can find the recipe we used here: http://allrecipes.com/recipe/strawberry-jam/

4.  Strawberry Parfait

July 2, 2014 207 crop parfait

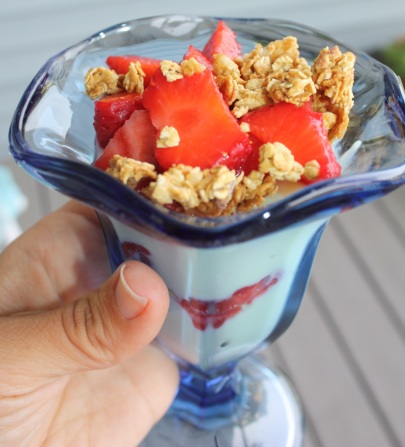
This is one of our favorite choices for breakfast.  Simply use your favorite yogurt, fresh strawberries (chopped) any other desired fruits, and granola.  Layer and enjoy!! 🙂

5.  Strawberry Banana Smoothie

July 2, 2014 phone 021 crop

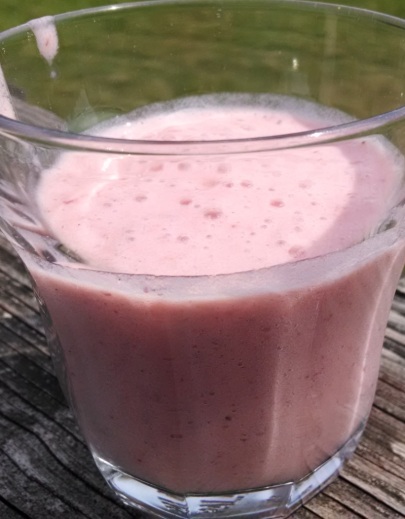
Nothing beats a refreshing, fruit-filled smoothie on a hot day!  You can use any fruit you have on-hand, but here is one of my favorite combinations:

  • 1 cup milk
  • 1 cup fresh strawberries
  • 1 cup fresh pineapple, chopped into bite-sized pieces
  • 1 frozen banana

Blend all ingredients together until smooth.  Enjoy!! 🙂  Note:  Make sure at least one of your ingredients is frozen to make your smoothie cold.  In the absence of frozen fruit, you may want to add some ice to make it cold.  If this doesn’t appeal to you, try my other Strawberry Banana smoothie recipe, my Strawberry Banana Peanut Butter smoothie, or create your own yummy combination!
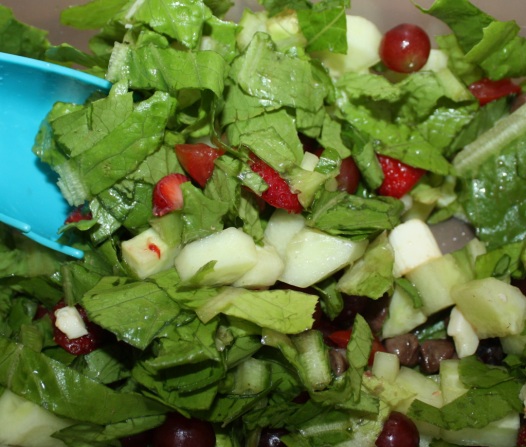
6.  In a salad

I love strawberries in my salad!  I also like to add blueberries, grapes, pineapple, cashews, and chocolate chips in addition to the lettuce, tomatoes, and cucumbers! 🙂  The fruit adds a wonderful juiciness that practically eliminates the need for salad dressing.  YUM!!
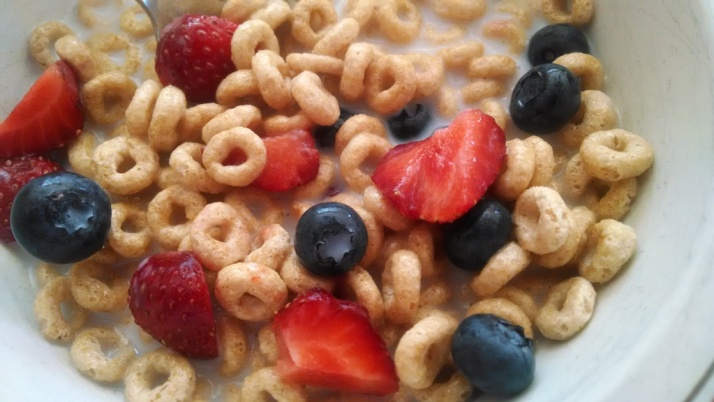
June 26, 2014 041 crop

7.  In  your cereal

We love adding fresh berries to our cereal.  Yum!!

July 5, 2014 phone 005

8.  Freeze them.

July 3, 2014 040 crop

If you have more strawberries than you know what to do with, you can freeze them for later use.  To freeze, begin by removing the stems.  Lightly rinse them and allow to dry.  Then, place them on a piece of wax paper on a cookie sheet in the freezer.  Once frozen, transfer to a ziploc freezer bag.

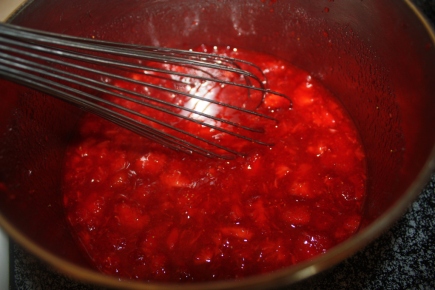
9.  Topping for cheesecake, ice cream, or pancakes

July 3, 2014 060 July 3, 2014 055 crop

My kids absolutely love this stuff!! Here is the recipe we used (next time I’m going to double it!):

Ingredients:

  • 2 cups fresh-picked ripe strawberries
  • 1/3 cup white sugar
  • 1 teaspoon vanilla

Directions:

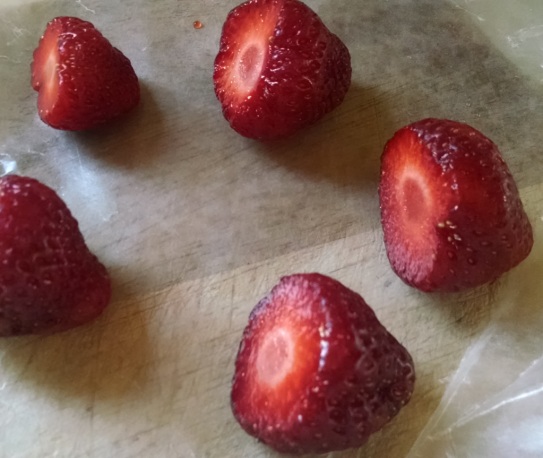
  1. Wash strawberries and remove stems.
  2. Chop strawberries
  3. Combine sugar, vanilla, and 1 1/2 cups strawberries in a saucepan. (Set aside remaining 1/2 cup strawberries.) 
  4. Cook over medium-high heat, stirring occasionally.  Cook until sauce thickens, about 15 minutes.
  5. Remove from heat.  In a blender, puree mixture.  Add in the 1/2 cup strawberries you had previously set aside.
  6. Store in refrigerator.

The original recipe can be found here: http://allrecipes.com/Recipe/Supreme-Strawberry-Topping/Detail.aspx

I was also hoping to make strawberry pie and strawberry shortcake with fresh-picked strawberries this year, but unfortunately strawberry season is now over in my area so I’ll have to try those out next year.

10.  Strawberry Pie

Update 7/9/15:  I made Strawberry Pie with my daughters this season, and it was delicious!  The link to the recipe I used may be found on my blog Stacy Loves here.

strawberry-pie2

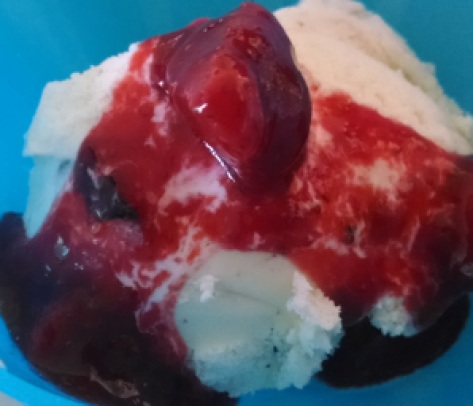
11. Strawberry Ice Cream

Update 6/16/16

This strawberry ice cream, made with freshly picked strawberries, is the perfect treat on a hot, summer day!  The recipe can be found on Stacy Loves here.

Strawberry ice cream recipe

What is your favorite way to eat strawberries?  Do you have a favorite use for strawberries that is not included here?  Please leave a comment below.

Healthy Summer Recipe: Watermelon & Fruit “Cake”

June 14, 2014 012 crop

Here is a fun and healthy recipe to take to any summer potluck. We’ve already made this for a few occasions, and it was a huge hit! This is a super-easy (and healthy) recipe to make and the kids love to get involved! My 6-year-old daughter designed this watermelon cake for her cousin’s birthday party. You can use any fruit you like in this recipe, but this is what we used:

 Ingredients:

1 Whole Watermelon

2 Kiwi, peeled, halved, and cut into ¼ inch slices

½ fresh pineapple, cut into bite-sized chunks

1 can (11oz) mandarin orange segments, drained

Fresh strawberries (about 20)

Chocolate chips (about 20)

¼ cup blueberries

Red grapes (about 20)

Green grapes (about 20)

Instructions:

  1. Lay the watermelon on a cutting board.  Find the thickest part of the watermelon (the center). Cut a 3½-inch slice of the thickest part of the watermelon. Lay the slice flat on the cutting board and cut the rind off, making it as close to a circle as possible. (Ours ended up being 7 inches in diameter). Place this slice directly on the dish you will be using to serve. (We used a round cake taker because we were transporting it to a party.)
  2. June 26, 2014 051 June 26, 2014 052 June 26, 2014 055 June 26, 2014 057
  3. From one of the remaining watermelon halves, cut a 2 ½-inch thick slice. Lay it flat on the cutting board, and cut off the rind, forming a circle (our circle ended up being 4 ½ inches in diameter.) Center this slice on top of the larger slice.
  4. June 26, 2014 059 June 26, 2014 061
  5. Cut the remaining watermelon into bite-sized pieces to mix in with your other fruit if desired.
  6. Now comes the fun part, where you may want to get the kids involved! Decorate as you wish, using any fruits you like and arranging them into patterns if desired.  If you like the way ours came out, just copy the picture.  Otherwise, get creative with your designs.  The possibilities are endless!!
  7. If you’re transporting the cake to a party, you may need to make additional adjustments when you arrive.
  8. Enjoy!! 🙂


Perfect Summer Potato Salad

June 10, 2014 126 summer potato salad blog

Nothing says summer to me like a cool, refreshing mix of potatoes, eggs, cucumbers, and celery mixed with the perfect blend of spices in creamy mayo.

To make it healthier and minimize my use of processed ingredients, I made my own Italian salad dressing.  If you’re running short on time, store-bought dressing will work.  But if you have a few minutes, give the homemade dressing a try and you will see how simple it is to make.  This delicious substitution is healthier and less expensive than the store-bought, and it gives me peace of mind being able to control the oils I use and to eliminate the high fructose corn syrup that is present in virtually all store-bought dressing.

The following recipe is my idea of a perfect potato salad.  Feel free to add or eliminate ingredients to your liking (for example, my family doesn’t like onions, but add them if you like).


Ingredients

4 medium Yukon Gold potatoes, washed and cubed into bite-sized pieces

¼ cup Italian Dressing (recipe below)

½ teaspoon salt

pepper, to taste (I just use a few shakes)

½ cup mayonnaise (we use Kraft Real Mayo)

1 medium stalk celery, chopped into bite-sized pieces

1 cup cucumbers, chopped into bite-sized pieces

2 hard boiled eggs, chopped into bite-sized pieces

Instructions


  1. Add potatoes to a pot, adding just enough water to cover. Heat to boiling; reduce heat. Cover and cook until tender. Drain and cool.
  2. After potatoes are cool, stir in Italian dressing, salt and pepper. Cover and refrigerate at least 2 hours.
  3. Just before serving, toss with cucumbers, celery, eggs, and mayonnaise until potatoes are well coated.  Enjoy!


Italian Dressing recipe (makes 1 1/3 cups)

½ cup white vinegar

½ cup olive oil

2 ½ Tablespoons Grapeseed oil

1 Tablespoon water

½ teaspoon garlic powder

½ teaspoon onion powder

1 teaspoon honey

1 ½ teaspoon dried oregano

1/8 teaspoon black pepper

1/8 teaspoon thyme

¼ teaspoon basil

1 teaspoon parsley

1 teaspoon Himalayan pink salt (if you don’t have any, just use regular salt)

Pour ingredients into a 2 ½ cup glass measuring cup. Transfer to a glass salad dressing bottle. Cover and shake well. Refrigerate to store.

Recipe modified from http://www.pennilessparenting.com/2010/07/perfect-homemade-italian-dressing.html.

Recipe: Butter Chicken

May 19, 2014 007 crop

Here is a chicken recipe that all 3 of my kids love (and believe me, it’s not easy to get all 3 of them to agree on ANYTHING!)

Before my kids tried it, they were complaining that we were having chicken AGAIN.  After trying it, they were raving about it and even went back for seconds and thirds.  They even gobbled up the cold leftovers the next day!

In an effort to minimize waste and make clean-up easier, I prepared it entirely in the baking dish.  Previously when I would make chicken with egg or crackers, I would use a separate bowl for the egg and a separate bowl for the crackers, and then I would end up with a sink full of dishes after preparation.

Except for the Ritz Crackers, this recipe uses all REAL food ingredients.  I often struggle with finding a good balance between healthy foods and foods my kids will actually eat.  If anyone has any suggestions on a healthier, kid-friendly replacement for the Ritz Crackers, I would love to hear them!

Ingredients

4 skinless, boneless chicken breast halves

2 eggs, beaten

1 cup Ritz crackers, crushed

2 Tablespoons Parmesan cheese

1/4 cup butter, cut into pieces

2 cloves garlic, minced

Instructions

1.  Preheat oven to 375 degrees

2.  Rinse chicken, then place in a 9″ x 13″ glass baking dish.

3.  Pour egg evenly over chicken.

4.  Sprinkle crackers evenly over chicken.

5.  Sprinkle Parmesan cheese evenly over chicken.

6.  Spread out pieces of garlic and butter throughout the dish.

7.  Bake for 40 minutes or until cooked through.

Recipe: Roasted Broccoli

May 16, 2014 JourneyToCompleteWellness.ComI am always trying to get more vegetables and Superfoods into my diet.  Broccoli is a Superfood and cancer-fighting food.

I’ll admit, I’m not very motivated when it comes to washing, cutting, preparing, and cooking vegetables.  Especially since I’m usually the only one in my family who will eat them.  Unfortunately, more vegetables rot in my refrigerator than I would like.  I have good intentions when I’m at the grocery store, but unless I buy them for a specific purpose, I usually forget about them and they sit there until I get the motivation to do something with them.  Or they rot.  And it really bothers me when I have to throw food away.

So, I was really excited when I found this super-easy recipe for roasted broccoli.  I made it with dinner last night, and I had to stop myself from eating the entire thing in one sitting.  I easily could have!

I found this recipe on Facebook in January and tried it for the first time then.  Here is the link to the original post on Instagram:  http://instagram.com/p/i6oZ17zgvm/#

Here is my recipe, just slightly different:

 Ingredients

1 head of broccoli, chopped

2-3 cloves garlic, minced

2 Tablespoons olive oil

salt and pepper, to taste

1/2 lemon (optional)

Instructions

1.  Preheat oven to 375°

2.  Place broccoli, garlic, olive oil, salt & pepper in a ziploc bag and shake.  Alternatively, place all ingredients into a bowl and mix well.

3.  Spread out on baking sheet covered with aluminum foil.  Bake about 30 minutes.

Broccoli will be crunchy and delicious!  If desired, squeeze lemon over broccoli.  This is optional, but I do this because I love anything with lemon.  Enjoy!

For lunch today, I served the leftovers with rice and a little bit of shredded cheese.  The broccoli wasn’t as crunchy as it was when I first cooked it, but it was still delicious!  I plan to make this again VERY soon!!  I think I could eat this every day.  Now if I could just get the rest of my family to try it! 🙂

May 16, 2014 030 crop broccoli

Recipe: Peanut Butter Energy Balls

     
Recipe: Peanut Butter Energy Balls

Prep time: 

Total time: 

Serves: 14-17 balls

If you love peanut butter and chocolate as much as I do, here is a quick and easy recipe you can tailor to your own tastes. This simple snack takes only minutes to make, and it is packed with nutrition and energy. Enjoy!
Ingredients
  • 1 cup rolled oats
  • ½ cup Natural peanut butter
  • ½ cup chocolate chips
  • 8 dates (pitted)
  • 1 Tablespoon flax seeds (or other seeds of your choice)
Instructions
  1. Place oats and flax seeds into a food processor and grind until smooth. (I find this works really well in my NutriBullet) Pour into bowl of a stand mixer.
  2. Place dates into food processor (or NutriBullet) and grind until smooth. Add this to the oats and seeds in the stand mixer.
  3. Add peanut butter to the stand mixer. Mix on low until all ingredients are combined well. Add the chocolate chips.
  4. Using a Tablespoon, scoop out the mixture and roll into a ball. Makes about 14-17 balls.
  5. Store in an airtight container and store in the refrigerator.
Notes
Feel free to add additional ingredients such as shredded coconut, nuts, and seeds to your liking. Enjoy!


Strawberry Banana Smoothie

This is a great smoothie to soothe a sore throat or cough.  My kids love the taste, and they love the pink color!  It’s also a great way to benefit from the healing properties of raw honey if you don’t like eating honey straight.  🙂

April 7, 2014 038 crop

Ingredients:
½ cup apple juice

½ cup filtered water

1 ripe banana

1 Tablespoon raw honey (local is best to help with seasonal allergies)

1 cup frozen organic strawberries

Instructions:
1.  Place all ingredients into blender except the strawberries.  Blend until smooth.

2.  Add the strawberries.  Blend until smooth.

Notes:  This smoothie is thick.  If you would like it thinner, add more liquid.  Do not feed raw honey to infants under 1.

Yield:  20 ounces