I just discovered coconut oil last year, and I can’t say enough good things about it! I love that stuff and can’t imagine how I ever lived without it! I use it daily in cooking, baking, and on my skin, teeth, and hair. I recommend it to everyone! As I mentioned in my post 10 Things I Learned in 2013, I feel like coconut oil was the best thing I discovered in the past year. When people ask me for tips on eating healthier, my first suggestion is usually to replace their vegetable oils with coconut oil. It is a simple change that is hardly noticeable, but the benefits are many.
What is it/How is it Made/How do I select the right product for me?
Coconut oil is the oil extracted from coconuts. There are two different types of coconut oil: refined and unrefined. If you do not like the taste or smell of coconuts, you may want to opt for the refined oil because it is generally tasteless and odorless. If you do go with the refined oil, just be sure it is not hydrogenated or partially hydrogenated because the hydrogenation process creates synthetic trans-fats. “Virgin” or “Extra-Virgin” Coconut oil is unrefined and it tastes and smells like coconut. If you need additional help in choosing whether you want refined or virgin coconut oil, check out this great article here.
Where Can I Buy It?
With coconut oil gaining in popularity, you can find it just about anywhere. I have seen it at my local grocery store in the organic foods section. I have also seen it at my local Walmart next to the cooking oils. You can also buy it in health food stores, and online here.
Uses of Coconut Oil
Coconut oil has many health benefits and is said to help with weight loss, diabetes, cholesterol, Alzheimers, and many other health conditions. I can attest to it helping with cholesterol. Last year I threw out my huge jug of canola oil and replaced it with coconut oil. Since I no longer keep vegetable oils in the house, when baking I now use coconut oil in any recipe that calls for vegetable oil. When cooking, coconut oil may be used in place of butter or other oils in temperatures up to 350 degrees. I most commonly use coconut oil when cooking eggs or popcorn. As a result of this healthy replacement, my “good” cholesterol went up and my “bad” went down as of my last cholesterol screening in October.
Coconut oil has many uses for the skin and hair as well. It is a popular ingredient in many homemade natural products. I use it daily as a facial moisturizer (as an added bonus, it is naturally an SPF of 4). I use it as a moisturizing body lotion, as a replacement for chapstick, and I have recently started using it for oil pulling. For more information on oil pulling, check out this article. There are so many more uses for coconut oil. Check out Wellness Mama’s great list of 101 uses here.
More information & Resources
Coconut oil is a solid at room temperature. It naturally melts and becomes a liquid at 76 degrees Fahrenheit. When it cools back down, it returns to a solid.
Check out Coconutoil.com for the most up-to-date research on the benefits of coconut oil.
With coconut oil becoming a natural beauty staple in recent years, Reviews.com set out to find out which options stood apart by being ethically sourced by socially responsible brands. They tested the top oils to create a guide to help any natural beauty maven. Check out their recommendations for the best coconut oil here!
I have a new favorite smoothie (and it is kid-friendly, too!)
Over the past week, I have tried this recipe with many different additions and variations, but so far this one is my favorite. My 11-year-old daughter loves it, too! Here is the recipe:
INGREDIENTS:
½ cup apple juice (preferably freshly juiced in a juicer, but store-bought works, too. Our favorite apple to juice is Gala, but try different types to see what you like best )
½ cup water
¾ cup tightly packed organic greens (I use baby spinach & spring mix, but any greens you like will work)
2 Tablespoons natural peanut butter
1 frozen banana
1 cup frozen raspberries
DIRECTIONS
Blend apple juice, water, and greens in a blender until greens are dissolved.
Add the rest of the ingredients and blend until completely smooth.
A few notes:
1. It is very important to use frozen raspberries and banana. If you don’t have frozen, you may want to add a handful of ice. I have found that you cannot taste the greens at all if the smoothie is very cold. If you let it get warm, you will begin to taste the greens.
2. You do not need a fancy blender. Mine is over 12 years old, and is still working just fine.
3. If you prefer it thicker, use less liquid. Feel free to play with it and add nuts, seeds, pineapple, different berries, different types of juice or milk in place of the apple juice and water, etc. I love smoothies because you can play with the recipes and adjust according to your own preferences.
Give it a try, and let me know what you think! Enjoy 🙂
½ cup apple juice (grape juice or orange juice will also work)
½ cup water
¾ cup tightly packed organic greens (I use baby spinach & spring mix, but any greens you like will work)
2 Tablespoons natural peanut butter
1 frozen banana
1 cup frozen raspberries
Instructions
Blend apple juice, water, and greens in a blender until greens are dissolved.
Add the rest of the ingredients and blend until completely smooth.
Notes
1. It is very important to use frozen raspberries and banana. If you don't have frozen, you may want to add a handful of ice. I have found that you cannot taste the greens at all if the smoothie is very cold. If you let it get warm, you will begin to taste the greens.
2. You do not need a fancy blender. Mine is over 12 years old, and is still working just fine.
3. If you prefer it thicker, use less liquid. Feel free to play with it and add nuts, seeds, pineapple, different berries, different types of juice or milk in place of the apple juice and water, etc. I love smoothies because you can play with the recipes and adjust according to your own preferences.
Granola bars are a staple in my house. I used to buy a box or two every time I was at the grocery store because my family goes through them so quickly. When I decided to check out the ingredients list one day, I did not love what I saw. I saw a huge list of unpronounceable and unrecognizable ingredients, preservatives, corn syrup and oils that I had been trying to stay away from. You can check out the ingredients in a popular brand here.
I set out to find a healthier recipe to feed my family. I tried several different recipes until I found one that my family liked. I started with this recipe called Playgroup Granola Bars from Allrecipes.com, and then I made some healthy modifications so I could feel better about feeding these to my family. When making modifications, I try to minimize or eliminate all processed ingredients and GMO’s whenever possible, including white sugar, white flour, and vegetable oils. There is still more sugar in here than I would like, but I feel better knowing there is no corn syrup or dangerous oils or preservatives that I have been trying to stay away from.
Here is the recipe I currently use, and my family loves them. The great thing about granola bars is that you can customize them to your liking. Add whichever nuts, seeds, and dried fruits you like. My family loves them with chocolate chips instead of cranberries or raisins. Again, not the healthiest choice, but I still feel better feeding them these granola bars because I know I have carefully selected each ingredient that goes into them, and they do not contain preservatives or any unpronounceable ingredients. Give them a try. I’d love to hear what you think! 🙂
Homemade Granola Bars
Ingredients:
2 cups rolled oats
1/2 cup packed brown sugar
1/2 cup flax seeds or wheat germ (or 1/4 cup of each)
3/4 teaspoon ground cinnamon
1 cup whole wheat flour
1 cup raisins or dried cranberries (or chocolate chips)
1/4 teaspoon salt
1/2 cup honey (local is best!)
1 egg, beaten
1/2 cup applesauce
2 teaspoons vanilla extract
Directions:
1.
Preheat the oven to 350 degrees F. Grease a 9×13 inch baking pan.
2.
In a large bowl, mix together the oats, brown sugar, flax seeds and/or wheat germ, cinnamon, flour, raisins (or cranberries/chocolate chips) and salt. Make a well in the center, and pour in the honey, egg, applesauce and vanilla. Mix well using your hands. Pat the mixture evenly into the prepared pan.
3.
Bake for about 23 minutes in the preheated oven, until the bars begin to turn golden at the edges. Cool for 5 minutes, then cut into bars while still warm. Do not allow the bars to cool completely before cutting, or they will be too hard to cut.
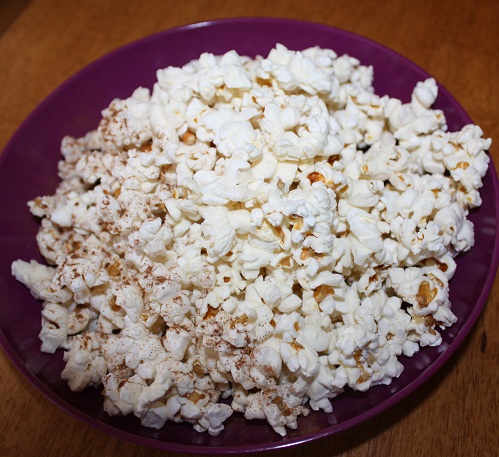
I am always on the lookout for healthier versions of the foods I feed my family. When I first began on this journey, one of the first foods I tried to find a healthy replacement for was popcorn. Popcorn is a whole grain food, a good source of fiber, and it can be a healthy snack when the ingredients are carefully chosen. Unfortunately, the toxic chemicals added to microwave popcorn and the GMO’s(genetically modified ingredients) present in most of the popcorn sold in grocery stores can cause more harm than good and turn people away from this snack altogether. That doesn’t have to be the case. We can still feel great about enjoying this healthy snack by carefully selecting the ingredients we use to prepare it.
For more information on GMO’s and why you may want to steer clear of them, I suggest watching the documentary Food, Inc. You can watch the trailer here. It is available to watch on Netflix here. *Warning: That film may change the way you eat forever…that is what happened to me, anyway. At the very least, it will make you think about the source of your foods. Do not let it overwhelm you. I have found that making small changes was the best strategy for me and my family. If you try to do it all at once, it is very overwhelming and you will feel like there is nothing you can eat. Instead, I try to find healthy replacements, one food at a time. I hope to share all the changes I have made so far with you in this blog, one at a time.
After becoming aware of all the toxic chemicals in microwave popcorn and the dangers in GMO corn, the first thing I did was get rid of the microwave popcorn in our house. Then, I went on a search for organic popcorn and good, quality oils that do not contain GMO’s. So far, I have not been able to find organic popcorn in my local grocery stores. I usually get it on-line here. My favorite oil to use when preparing popcorn is coconut oil. Coconut oil is said to have many health benefits, and you can read more about it here.
For a healthy snack you can feel great about eating, here are the ingredients and methods of preparation you may want to use:
Coconut Oil (as with the organic popcorn, it is very important not to use genetically modified oils.) Coconut oil can be found in health food stores or in local grocery stores, or find it on-line here.
Desired Seasonings (salt, butter, etc.)
Preparation Methods
There are 3 different methods of preparation I use for making popcorn. The method I choose depends on how much time I have and how much effort I feel like putting into it at the moment.
1. Microwave Method
While I do try to avoid using the microwave whenever I can, this is the quickest, easiest, and most convenient way I have found to prepare popcorn. I put 1/4 cup of organic popcorn kernels and about 1/2 Tablespoon of coconut oil into a brown paper lunch bag, fold the bag loosely 2 times, and put in the microwave for 2 minutes. Microwave ovens vary, so you may need to adjust the time to see what works best for you to get most of the kernels popped without burning any. Remove from microwave and season as desired. I usually use a little salt and about a tablespoon of butter, but sometimes I switch it up and put cinnamon or other seasonings on it instead. *Note: Do not put more than 1/4 cup in at once, or the bag will open and the popcorn will overflow while in the microwave (that did happen to me.)
With the microwave method, I found that most of the kernels get popped and it is very quick and easy to do. This is the method I use the most often because it is the easiest.
2. Air Popped Method
The advantage of this method is that you don’t need to use oil to cook the popcorn in, so it saves on oil and it is healthier if your trying to minimize the amount of fat. This method takes longer than the microwave method, requires some cleanup, and I have found that there are usually still a lot of unpopped kernels. I make it this way occasionally.
1. Add 1/2 cup organic popcorn kernels to your air popper
2. Place the cover on the popper
3. Place a large bowl in front of the chute where the popcorn will come out, plug it in, and wait a few minutes while it pops your popcorn and dispenses it into your bowl.
4. When the popping sounds slow to intervals of 2-3 seconds, turn off the popper.
5. Season as desired
6. Discard any remaining unpopped kernels in the popper.
3. Stove Method
This method takes the longest, requires the most oil, and more cleanup is involved, but I think this method tastes the best. With this method, nearly all of the kernels pop and none of them are burnt. I originally learned about this method here, but I made a few very slight modifications, and it works beautifully. This is what I do:
Ingredients
3 Tablespoons Coconut Oil
1/2 Cup Organic Popcorn
Seasonings, as desired
Method
1. Heat coconut oil and 2-3 popcorn kernels in a 3-quart saucepan on medium high heat and cover the pan.
2. When the kernels pop, add the rest of the popcorn kernels in an even layer. Cover, remove from heat and count 30 seconds. This method first heats the oil to the right temperature. Waiting 30 seconds brings all of the other kernels to a near-popping temperature so that when they are put back on the heat, they all pop at about the same time.
3. Return the pan to the heat. The popcorn should begin popping soon, and all at once. Once the popping starts, gently shake the pan by moving it back and forth over the burner. Try to keep the lid slightly ajar to let the steam from the popcorn release (the popcorn will be drier and crisper). Once the popping slows to several seconds between pops, remove the pan from the heat, remove the lid, and pour the popcorn into a bowl.
4. Season to taste. I usually use about 2 tablespoons butter, and salt to taste. If you are adding butter, you can easily melt it by placing the butter in the hot pan you used to pop the popcorn.
The result: A healthy snack that you can feel great about eating and serving to your family! Enjoy! 🙂
Heat coconut oil and 2-3 popcorn kernels in a 3-quart saucepan on medium high heat and cover the pan.
When the kernels pop, add the rest of the popcorn kernels in an even layer. Cover, remove from heat and count 30 seconds. This method first heats the oil to the right temperature. Waiting 30 seconds brings all of the other kernels to a near-popping temperature so that when they are put back on the heat, they all pop at about the same time.
Return the pan to the heat. The popcorn should begin popping soon, and all at once. Once the popping starts, gently shake the pan by moving it back and forth over the burner. Try to keep the lid slightly ajar to let the steam from the popcorn release (the popcorn will be drier and crisper). Once the popping slows to several seconds between pops, remove the pan from the heat, remove the lid, and pour the popcorn into a bowl.
Season to taste. I usually use about 2 tablespoons butter and ½ teaspoon salt. Feel free to add any additional seasonings to taste. If you are adding butter, you can easily melt it by placing the butter in the hot pan you used to pop the popcorn.
Here is another dish that has made it onto my Thanksgiving menu. It is delicious and contains only “real food” ingredients.
Roasted Autumn Vegetables with Cranberries
Ingredients:
1 medium butternut squash
1 large onion
1 cup broccoli
1 red pepper
4 Tablespoons olive oil
Himalayan Pink Salt (or Fine Sea Salt)
4 Tablespoons dried cranberries
Feta cheese to top
Preheat oven to 375 degrees. Peel, halve, and remove seeds from squash and cut them into large chunks. Peel onion and cut into large chunks. Chop broccoli into large chunks. Slice red peppers. Toss vegetables into the olive oil, season with salt and pepper to taste.
Bake on a parchment or waxed paper-lined baking sheet for about 30 minutes.
When vegetables are well caramelized, top with cranberries and Feta. Enjoy!
With less than two weeks left until Thanksgiving, the pressure is on to find some terrific new recipes that are both healthy and delicious to serve to my guests. Today I feel like I hit the jackpot!
I discovered and tried this amazing recipe for “Pumpkin Fluff Dessert Dip” on 100 Days of Real Food. My entire family loved it, including my picky 9-year-old who won’t even look at anything orange! All ingredients are real food ingredients, which gives me even more reason to love it! This recipe certainly makes the cut on my Thanksgiving menu!
1 teaspoon pumpkin pie spice mix (found in the spice aisle)
1 cup pumpkin puree
Optional garnish: A few extra sprinkles of pumpkin pie spice (or just plain cinnamon)
Optional dippers: Sliced apples and whole-wheat graham crackers
Instructions
In the bowl of your mixer fitted with a whisk (or use a large mixing bowl and electric beaters), combine the heavy cream, cream cheese, syrup, vanilla, and pumpkin pie spice. Turn the mixer to low and blend until the cream cheese is broken up and no longer in big clumps. Turn the speed up to high and blend until the mixture thickens, about 1 to 2 minutes.
Turn the speed back down to low and carefully blend in the pumpkin puree. Scrape the bowl with a spatula if necessary.
Serve with sliced apples and whole-wheat graham crackers. Store leftover dip in the fridge.
Over the past month, I have been taking the “October Unprocessed” challenge. I pledged to eat only REAL, unprocessed foods for the entire month of October. Many benefits resulted from this experience, including the inspiration to begin this blog, Journey to Complete Wellness. Read on to see the other benefits and challenges I encountered. 🙂